Wednesday, December 30, 2009

Stuffed Ham Roast


With all your effort to make New Year's Eve perfect don't forget to give a little time to make New Year's Day special, a perfect opportunity to connect with your loved ones. I mentioned my plans earlier this week, spend the day with The Hub relazing and sipping on Vietnamese Pho soup. Last weekend I made a more traditional New Years Day dinner so I could give you some more traditional ideas for your meal.

This roast is a little more elegant than the standard simply because of the stuffing. It's all very easy so you can spend your time with your family or guests.

I used a ham cut for the roast. This was not a cured ham but rather the cut that is used to make the cured ham. If you aren't able to find this roast pick up any other type of roast as long as it is deboned or you can debone it relatively easily. If you choose a loin cut reduce the cooking time by 30 minutes.

Stuffed Ham Roast
5 pound ham roast
1 cup chicken broth

Coating/Marinade
7 cloves of garlic
1 tbsp dried thyme
1 tbsp kosher salt
1 tsp ground black pepper
1 tsp oregano
1/2 tsp crushed red pepper
2 tbsp olive oil

Stuffing
1 pound swiss chard
1 1/2 cup dry stuffing mix (prefer Pepperidge Farms Herb Seasonedd Bread Crumbs)
2 tbsp butter
1 tsp dried sage
2 celery ribs - diced
1/4 cup diced red onion

If your roast has a bone - debone the roast. Once you have a roast without a bone, you will need to butterfly the roast. Don't worry! This is easy! Give the roast a slice down the middle halfway through the roast. You will basically cut each side in half horizontally being stopping before you cut all the way through the meat. Turning your knife sideways with the edge of the blade to the left so that it is parallel to the counter. Cut through the roast to open it up on the left side being careful to stop about an inch before you cut through the meat. Do the same to the right side. Now you should be able to open up the roast so there is double the surface area and it is laying flat on your cutting board.

Mince the garlic cloves. Lie the roast on a saran wrap. Mix all the marinade ingredients in a small bowl. Spread 1/2 the mixture over each side of the pork.

Wrap the saran wrap around the pork and let marinade in the coating for about 3 hours in the refrigerator.


Melt the butter for the stuffing in a saucepan. Once melted add the celery, onions, and sage. Saute for about 3 minutes. Add the stuffing mix stirring until combined. Place in a bowl in the refrigerator until you are ready to stuff the roast.

Wilt the swiss chard greens and set aside to cool in the refridgerator.

Heat oven to 375 degrees.

About 3 hours after marinating the roast in the garlic coating remove from the refridgerator. Spread the butterflyed roast out so it lies flat. Place the wilted greens on half of the roast. Place the stuffing mix on top of the greens. Pull the other half of the roast on top of the stuffing side the pork. Place in a roasting pan with the chicken broth on the bottom of the roasting pan so the pan is not dry. Cover the pan with tin foil to seal in moisture

Cook the roast in a 375 degree oven for 1 1/2 hour. After one hour of cooking remove the tin foil to allow the roast to brown. Once the roast has finished cooking remove from the oven and cover with the tin foil to seal in the heat.

Let rest for 10 minutes to allow the juices to redistribute. Slice and serve the roast. Serve with your favorite side dishes.

Tuesday, December 29, 2009

Spinach and Shitake Mushroom Triangles


This is a great New Year's appetizer. I love the crisp flaky exterior of the puff pastry with the warm creamy vegetable filling!

Spinach and Shitake Mushroom Triangles
1 sheet puff pastry
1 tbsp olive oil
1/2 pound of shitake mushrooms (about 10)
1 bag baby spinach
1 cup of Gruyere cheese
1 egg - beaten

Heat the oven to 400 degrees.

Thaw a sheet of puff pastry. Lightly flour your surface. Unfold the pastry and cut along the crease to create three 3-inch wide strips. Cut each strip into three equal pieces so you have nine squares. With a rolling pin, roll each square to thin it out retaining the square shape.

Remove and discard the shitake mushroom stems. Slice the mushroom caps into thin strips.
In a skillet, place the oil and saute for about 4 minutes. Add the spinach.
Cook until the spinach is completely wilted - about 3 minutes, stirring occasionally.

On each square place about a tablespoon of cheese.
Divide the mushroom/spinach mixture between the nine puff pastries. Top with any remaining cheese. Fold the puff pastry over and crimp with a fork to seal in the filling.


Lightly brush each pastry with the egg mixture.

Place in the oven and cook for about 10 minutes until lightly golden. Remove and serve.

Monday, December 28, 2009

Roasted Cauliflower with White Cheddar Cheese and Dill


Cauliflower is a forgotten vegetable for me. I like it but I commonly don't think of it as an option. Cauliflower is a very nutrient dense food that is low in carbohydrates. I roasted the cauliflower with some chicken stock and cheese. Next time I make this I think I will cut the cheese amount at least in half. This was extremely tasty but I think it would be just as good and obviously more healthy without it. The cauliflower wasn't as strong in flavor as I remember.

Roasted Cauliflower with White Cheddar Cheese and Dill
1 head of cauliflower with the white florets cut into bite size pieces
1/2 cup chicken broth
1 tbsp dried dill weed
1 tsp kosher salt
1/2 cup black pepper
4 ounces white chedder cheese grated.

Heat oven to 375 degrees.

Place the cauliflower in a baking dish. Drizzle the broth over the cauliflower. Toss. Sprinkle the dill, salt, and pepper along with 1/2 the grated cheese. Toss. Sprinkle the remaining 1/2 of the cheese over top.
Bake in an oven heated to 375 degrees for 40 minutes. Enjoy!

Sunday, December 27, 2009

The Perfect New Year's Day Cocktail


Yes, I did mean New Years Day. Last year, The Hub and I had the best New Year's Day. We spent the day relaxing. I made these tasty cocktails to start along with some Asian soup to warm our souls. It was so special. I thought you'd appreciate it if I shared this recipe so you could plan to pick up the ingredients. Make this special drink for a special someone on a special day.

I'm planning on making last year a tradition. This year I'll make these cocktails with an Asian soup that's new to me, Vietnamese Pho soup.

Grapefruit-Gin Sour
Juice from 2 grapefruit
Juice from 1/4 of a lemon
2 shots of Tangeruay Gin
2 shots of simple syrup
1 cup ice cubes
2 tbsp sugar

Simple Syrup
1/2 cup sugar
1/2 cup water

Simmer the ingredients for the simple syrup until the sugar is dissolved. Cool.

Once the syrup is cool. Reserve 1 tbsp grapefruit juice. Combine the ingredients for the drink. Shake until frothy. Fold a 1/2 paper towel in half and place it on a plate. Pour the reserved tbsp of juice on the towel. On another plate place the 2 tbsp of sugar. Dip your glass in the juice on the towel and then dip in the sugar to create your sugared rim. Split the beverage between 2 glasses.

Saturday, December 26, 2009

Venison Gyro with Tzatziki Sauce


Remember that Delicious Tzatziki sauce I showed you how to make earlier in the week. Well the sauce did double duty for me. I was able to use the leftover sauce in these grilled venison gyros. I can't even describe how amazing venison is combined with this sauce.

There are many styles of pita bread. For this recipe I used a pita that was new to me. It's wonderfully crispy and almost a little too crispy to make a wrap with so if you can, go with a more traditional Greek style pita bread. (The crunchy pita was perfect for the dip from my earlier post.)

Venison Gyro with Tzatziki Sauce (serves 2)
3/4 pound of venison medallions
2 pitas - Greek style preferred
4 green onions or 1/4 red onion cut in slices
2 tbsp soy sauce
1 tbsp olive oil

Marinade the venison in the soy sauce and olive oil for at least 1/2 an hour.

Heat your grill to high. Once the grill is heated place the medallions on the grill. Flash grill for about 2 minutes on the first side and 1 minute on the second side. Venison is really meant to be rare so be careful not to overcook. Once done, remove and let rest for a few minutes covered in foil so they stay hot.

Once you flip the venison to the second side place the pita bread on the grill and cook for 20-30 seconds per side to lightly toast.

Slice the medallions and arrange 1/2 down the middle of each pita bread. Place 1/4 cup of tzatziki sauce down the middle of each along with a sprinkling of green onions.

This is so simple - you'll be amazed at how good it is!

Thursday, December 24, 2009

Szechuan Pepper Fried Shrimp with Crispy Green Onions


Szechuan peppers are one of my favorite spices. The flavor is very unique. No relation to peppercorns or peppers, szechuan peppers are actually the emptied husk of a tiny seedpod. When using fresh szechuan peppers it is easy to overpower a recipe so I am quite careful to start with a little and add at the end of cooking if the flavor isn't strong enough for my preference. The freshest szechuan peppers I've tried were from Penzeys.


My first encounter with this wonderful spice was actually in a wonderful Chinese restaurant in North Carolina. The spice was incorporated into a batter fried calamari dish that had charred green onions. I'm not particularly a batter fried fan when I cook at home so I use cornstarch to create a crust. I didn't have calamari so I used shrimp. Both are delicious so use what you have.

Szechuan Pepper Fried Shrimp with Crispy Green Onions
1 1/2 pound of shrimp - shells and tails removed
1/2 cup of cornstarch
1 1/2 tbsp sesame oil
1 1/2 tbsp soy sauce
4 cups canola oil
4 green onions - thinly slice
1 tbsp oil - canola or olive oil

In a large bowl toss the shrimp with 1 tbsp sesame oil and 1 tbsp soy sauce. Once the shrimp are coated in the sesame oil and soy sauce, dust the cornstarch over the shrimp and toss to coat.

Heat the oil to about 325 degrees. If you don't have a thermometer stick the end of a wooden spoon in the oil. The oil is hot enough when the the oil bubbles a little around the end of the spoon.

Drop the shrimp in the oil in small enough batches that you don't cool down the oil (about 8 shrimp at a time). Cook the shrimp until a light golden color - about 1 1/2 minutes per batch. Don't overcook the shrimp. Shrimp are so wonderfully delicate when they are cooked properly. Pull the shrimp out and place on a paper towel to remove excess oil. Continue cooking until all shrimp have been fried.

As you are cooking the shrimp heat a tbsp of oil in your favorite wok. Once the oil has reached the smoking point drop the green onions into the wok. Stir fry occasionally. I like to let the onions be still in the wok a little because this will allow the onions to char slightly. Once the onions are crispy, toss in the fried shrimp and drizzle over the remaining amount of sesame oil and soy sauce. Writing this post is driving me nuts, maybe I need to make this again this weekend.....

Stir Fried Szechuan Pepper Potatoes


I was reading food blogs this week and came across a new-to-me blog, Soup Belly, that made Sichuan Stir Fried Potatoes. When I initially read the blog post I thought the recipe used szechuan peppers but in actuality the name of the recipe is referring to the Sichuan province of China. I still need to go back and make this recipe because it does look good.

It did give me the idea however to use Szechaun peppers to season a wok stir fried potato dish. It turned out very pleasant and I would definitely make this dish again.

Szechuan Pepper Potatoes
3 large russet potatoes
3 garlic clove - thinly sliced
1 small onion - diced
3 green onions - thinly sliced
1/4 cup canola oil
2 tbsp szechuan peppers
1/2 tbsp sesame oil

Cut the potato in half. Quarter each half of the potato lengthwise and then cut in half. Continue until all the potatos are cut.

Place the potatos on a plate and microwave for about 2 minutes to give the potatos a cooking head start.

Heat the canola in a wok with 1/2 the garlic and 1 tbsp of szechuan peppers.

Once the oil is hot add 1/2 the potatoes.


Stir fry the potatoes in 2 batches cooking each batch for 8-10 minutes. After the first batch is done remove to drain on a paper towel. Continue with the second batch adding the remaining garlic slices and szechuan peppers prior to adding the potatoes. Once all the potatoes are cooked add them back to the wok along with the remaining ingredients: onion, green onion and sesame oil. Stir fry for about 2 minutes until the potatoes are cooked through. Serve with srirachi sauce.

Wednesday, December 23, 2009

Duck with Orange Brandy Glaze


Wow - was this a stressful dinner to make. The stress was self imposed because it really wasn't too difficult. I was stressed because I had already bought the duck so I was committed and after doing research it sounded impossible to make a duck that wasn't swimming in fat.

I relied on the cookbook, The Best New Recipe: All-New Edition by Cooks Illustrated Magazine to guide me through. Have you had a chance to pick this cookbook up and read it? It's great because the writers will take a dish and cook it various ways to test which cooking method makes the most flavorful result. They have also taste tested ingredients to guide you on which brands or products taste the best. For something like a cooked duck, which I've never cooked, it was a great resource. Although what caused me to be in a tizzy, is all the stories of the end product, in most cooking methods, being duck swimming in fat. But lets be fair. Following the guidance of the steam and roast cooking methods DID result in a very good dinner so I'm glad I had the resource.

Duck isn't something I would do often, mainly because of how much waste there was. After trimming excess fat I probably threw away as much fat in weight as there was meat in weight. Seemed wasteful but again, it was really good so cooking a whole duck is probably perfect for a special dinner once a year. I started with a whole duck and cut the bird into each piece: breast, wing and leg/thigh. Duck is probably much more economical and less wasteful if you are able to buy the individual pieces.

I didn't follow all the directions. Specifically I reduced some of the cooking time and temperature. I made up my own version of a yummy glaze that I thought would pair nicely with the duck flavors.

Duck with Orange Brandy Glaze
1 3 pound duck

Glaze
1/4 cup of orange marmalade
1/4 cup of brandy
salt and pepper

The writers of The Best New Recipe experimented with straight roasting, boiling and then roasting, and steaming and then roasting. Of all these methods the method that they said rendered the most fat out of the duck was the steaming/roasting version so this is what I did.

Cut the duck into sections keeping the leg/thigh together in once piece. Place a roasting rack in a metal roasting pan. Fill the bottom with water right up to the bottom of the rack so that the duck is not sitting in the water. Place the duck sections on the rack. Cover the pan with a piece of tin foil large enough to ensure a tight seal all the way around the pan. Place the pan on a burner on medium heat. Steam for about 35 minutes. After the 35 minutes of steaming, CAREFULLY loosen the seal. Slowly let the steam escape being careful not to burn yourself.

Heat oven to 400 degrees.

Mix together the ingredients for the glaze and place in a microwave for 20 seconds to loosen it up.

Place the duck pieces on a foil lined baking sheet and cook for 10 minutes. After 10 minutes brush the duck with the glaze and roast for another 10 minutes. The recipe from the cookbook cooked the duck longer, at a higher temperature, and instructed that you pull the breast meat out and allow the legs to cook for additional time. By looking at the duck during the cooking stage I thought that would cause the leg pieces to be overcooked. I adjusted the cooking time and temperature and I'm glad I did. I was able to get the crispy texture on the skin and the meat was incredibly moist.

Battle Duck was WON! :)

Tuesday, December 22, 2009

I Love Food Presents!!! :)


Tonight when I got home from work my garage door opener wouldn't work. I got out of the car and went to the front door to find a 'igourmet' box of goodies that instructed to open immediately because of perishables.

My heart started beating in excitement! Yes, I don't usually get food gifts. As soon as I got into the house I ripped into the box and I found this wonderful selection of cheese.

The background is my twin sister is spending the holidays in London with her husband, child, and friend. She sent me an array of English style cheeses. I honestly can't wait to enjoy them. I'm sure we'll have friends popping in and out this weekend and now I'll have something to feed them!

Thank you Sis-tah!

Tzatziki Sauce


Tzatziki sauce has always been one of my favorite sauces or dips. In the middle east this is commonly served as a sauce with gyros but I love it as a dip with pita chips. The dip is very refreshing served cold with a combination of yogurt and cucumbers with lemon juice and garlic. Even though this is usually served as a dip or with gyros it's also a great sauce accompaniment to a grilled vegetable burrito or wrap. Greek style yogurt is much thicker than American style yogurt.

If you can't find Greek style yogurt place plain yogurt in a cheese cloth and strain for a few hours.

Tzatziki Sauce
1 cucumber
1 1/2 tbsp kosher salt
1 cup greek style yogurt
1/2 cup sour cream
3 tbsp lemon juice - approximately juice from 1 lemon
2 cloves garlic - minced
4 pieces of pita bread
2 tbsp olive oil

Peel and deseed one cucumber.
Lengthwise cut the cucumber into thin strips.

Cut the thin cucumber strips in the opposite direction to create small cubes. Depending on your preference you may want to shred the cucumber instead of cubing. I prefer the chunkier texture. Place the cucumber in a small strainer and sprinkle the salt on top.

Mix the salt through the cucumber cubes. Let sit for about 20 minutes. After 20 minutes lightly squeeze the cucumber cubes to release extra water.


Mix the cucumbers with the remaining ingredients. Chill until ready to serve.

Cut the pita bread into triangles. Place a piece of tin foil on a baking sheet with 2 tbsp of olive oil. Toss the chips in oil. Bake at 400 degrees for about 5 minutes or until crisp.

Monday, December 21, 2009

Fancy Rice Krispie Balls


In preparation for New Years I'm trying to make a few things ahead that I can put in the freezer and pull out New Year's day. One of my colleagues brought in a few dessert balls that inspired these little desserts. Fortunate or unfortunate, I'm not quite sure, I didn't read the direction prior to making I just did what I thought. Turns out her dessert wasn't rice krispies with marshmallows at all. These turned out really good so maybe this is one of those times when a mistake leads to a good discovery. I made two different kinds: berry and chocolate.

Berry Rice Krispie Balls
1 package of large marshmallows
3 tbsp butter
6 cups of rice krispie cereal
1/2 blackberry jam
1 12 ou package of white chocolate
3 tbsp canola oil

In a pan, melt the butter. Once the butter is melted, add the marshmallows and jam. Heat on low heat stirring often to incorporate the marshmallows and the jam. When the marshmallows are completely melted add the rice krispies and stir to thoroughly coat the cereal. Line a baking sheet with wax paper or parchment paper. Pour the mixture on the paper and spread out. Refrigerate for about 1/2 hour until firm.

In a small bowl combine the white chocolate chips and 2 tbsp of canola oil. Microwave for about 30 seconds, stir, and microwave for another 30 seconds. Remove from the microwave and stir until smooth.

Once the krispie mixture has become firm, coat your hands in canola oil to prevent sticking while you make the balls. Make 1" balls until you've used all the krispie mixture. Pour a small spoonful of white chocolate over each. Place the balls back in the refrigerator to allow the white chocolate to firm up.

Chocolate Krispie Balls
Follow the ingredients and directions above, omit the jam and use semisweet chocolate chips instead of white chocolate.

Saturday, December 19, 2009

Kiser's BBQ Shack in Athens, Ohio


I would say I'm not a huge BBQ fan. Why? Because most of the time it's not done right. So often when I hear BBQ I think of that wonderful piece of meat that is so flavorful only to be smothered in a sweet, thick overpowering sauce that is so strong you can't even taste the meat.

Now if your in the same boat as I am, Kiser's BBQ Shack will redefine what you think of as BBQ. Kiser's BBQ Shack shook up the Athen's restaurant scene earlier this year when Sean, the owner, opened his BBQ pit in a small nondescript mall on East State Street.

You can tell when you come across someone that's just finished a lunch or dinner there. There is the typical dreamy look on their face with a relaxed smile. Usually the first thing they'll say is 'I just ate at Kiser's' with a little rub of their belly. The restaurant is full of happy patrons so I hope you can find a seat!

Seriously, I've had most of the BBQ meats on the menu. I think the only thing I haven't had is the brisket. The only reason why I've not had the brisket is Sean likes to tease us Athenians and only serves the brisket on Wednesday and Sundays. I've just not been fortunate enough to make it there on one of those days of the week. I think this Wednesday I'm going to have fix that.

The pulled pork is so amazing moist. The chicken wings are fall of the bone good of smoky chicken happiness. Kiser's has a few different sauces but my favorite is the Caroline sauce. It's a vinegar based sauce that wakes up all the pork goodness.

I haven't even mentioned the coleslaw. My Hub and I are kind of coleslaw afficianados. We honeymooned up in Maine which serves up a coleslaw that's creamy thick and sweet. Not a fav of mine. Kiser's coleslaw is so fresh. It has the perfect crunchy tanginess. The fries are all handcut and I've heard the beans are out of this world but haven't had a chance to try it yet.

Thursday, December 17, 2009

Smoked Teriyaki Salmon


This salmon recipe started with my sister. Years ago while visiting her in Florida she made a delicious salmon with a teriyaki glaze. I remember my husband went crazy for it. I can't remember exactly how she cooked the salmon but she either grilled or baked it. I wanted something a little different so I decided it would be pretty tasty if I smoked the salmon using my indoor smoker with the teriyaki glaze on top while it smoked.

The salmon turned out wonderfully moist with a sweet/salty taste from the teriyaki. For the teriyaki glaze recipe, see my previous post on 'Steamed Halibut with a Teriyaki Glaze'

Smoked Teriyaki Salmon
1 1/4 pound of fresh salmon
1 tbsp champagne vinegar
1/2 cup of teriyaki glaze
2 green onion sliced thin
1/2 cup of Cherry smoking chips

Marinate the salmon in the vinegar for 15 minutes.

Prepare your smoker. Place the smoking chips in the bottom of the main pan. Cover the small pan that sets into the main pan with tin foil to catch the drippings. Place the rack on top of this pan.

Once the fish has marinated, place the salmon on the rack. Spread the teriyaki glaze over the salmon fillet and sprinkle half of the onion slices over top the fillet. My salmon was quite thick so I covered the smoking pan with a large enough piece of tin foil to ensure that I could get a good seal all the way around so that no smoke would escape. If you have a thinner fillet just slide the lid that came with the smoker over it the way you would normally. Cook on the stovetop on medium heat for about 20 minutes. Again, I had a thick cut fillet. If your fillet is thinner you may want to check on it in 15 minutes. Let sit for a few minutes. Sprinkle the remaining fresh green onion slices over the salmon. Cut the 1 1/4 pound piece into 4 pieces and serve.

Wednesday, December 16, 2009

Stir Fried Broccoli with Ginger and Garlic


After a long weekend vacation, during which we consumed a lot of wonderful food heavy in calories, I couldn't wait to get a veggie fix. I combined ginger julienne slivers and garlic slices. The end product was extremely flavorful and well balanced.

Stir Fried Broccoli with Ginger and Garlic

2 cups of broccoli tops cut in medium sized pieces
1 inch cube of ginger
2 cloves of garlic
2 tbsp canola oil
1/2 tsp crushed red pepper
1 tbsp + 1 tsp salt
1 tbsp soy sauce

Bring a pot of water to boil. Add the broccoli and 1 tbsp of salt, cook, blanching the broccoli for about 2 minutes. Remove the broccoli from the water and rinse with cold water to stop the cooking. This technique will help you retain the beautiful green of the broccoli without overcooking.

Heat a wok with the canola oil. Once the wok and oil comes to a smoking point, add the broccoli. Stir the broccoli immediately. Add the garlic, ginger, salt, and red pepper. Stir fry for about 4 minutes. Add the soy sauce, stir and serve.

Tuesday, December 15, 2009

Poe's Tavern on Sullivan's Island


Sullivan's Island in South Carolina is by far our favorite vacation spot. We rent a house on the ocean. This time the house we rented is absolutely spectacular. Sullivan's Island gives you the best of both worlds. You have the ocean to enjoy but you also have the proximity of the big city, Charleston.

Poe's is a wonderful bar grill with great food. I've never had a bad meal there. It's fun in the warmer months because you can sit at the bar inside or outside.


This time we came with friends and family to watch the football game. My aunt ordered a burger and I ordered fish tacos. They looked so good we decided to share. It was way too much food but it was absolutely delicious.

The burger was topped with a wonderfully creamy blue cheese and buffalo shrimp. The fish taco had a citrus marinated mahi mahi fish with shredded cabbage. If you're ever in the neighborhood check it out, you won't be disappointed!

Monday, December 14, 2009

Black Bean Soup


The cold weather we are getting calls for a warming soup to keep our souls warm. Black bean soup is that hearty dish that everyone will go back for seconds.

Black Bean Soup
1 pound bacon - cut into 1/4 inch pieces
1 tbsp olive oil
1 large onion - diced
5 celery ribs - diced
1 tbsp cumin
1 tbsp chili powder
1 tsp black pepper
1/2 tsp crushed red pepper
4 16-ou cans of black beans - rinsed and drained
6 cups chicken stock
1/2 cup picked jalapeno
1/4 cup chopped cilantro

Saute the bacon until it is crisp in the olive oil. Remove the bacon from the pan and set aside. Add the onions and celery to the bacon grease. Saute for about 7 minutes. Add in teh cumin, chili powder, black pepper, and crushed red pepper. Saute for a few minutes. Add the beans and stock. Simmer for about an hour. When you are ready to serve, add the jalapeno, cilantro, and the cooked bacon to the stock.

Sunday, December 13, 2009

Olive Puff Pastry Spirals


This makes the perfect quick and easy snack. I always have olives from the olive bar in our fridge. This inspired me to figure a way to incorporate the olives in an appetizer.
Olive Puff Pastry Spirals

1 sheet puff pastry (thawed)
8 ounces sliced sopresseta
1/2 cup olive (variety) - chopped
1/2 cup Gruyere cheese - shredded
1 tbsp Dijon mustard

Heat the oven to 375 degrees.

Unfold the sheet of puff pastry. Chop the olives. With a spatula sprinkle spread the mustard across the pastry lengthwise. Line the slices of sopresetta lengthwise along 1/2 of the puff pastry. Sprinkle the olives and Gruyere cheese over the sopresseta.

On the side of the pastry sheet that has the olives and cheese start rolling the pasty up slowly. You will end up with a long roll of filled pastry dough. With a serrated knife cut 1/2 inch pieces.

Place the spirals flat on baking sheet. Cook for about 7 minutes.

Friday, December 11, 2009

Thai Red Curry Stew with Chicken and Vegetables


Curry of all kinds is hands down one of my favorite flavors. I love Indian, Thai and Chinese Curry. A few of the traditional Thai curries are red, green and panaag. I'd be hard pressed to pick a favorite. Our local international supermarket carries a wonderful selection of a canned curry paste in each of these varieties. The brand I buy is 'Maesri'. I haven't perfected my own curry blend partly because this product is so easy and delicious.

Thai Red Curry Stew with Chicken and Vegetables
2 large chicken breasts
2 tbsp olive oil
4 carrots
1 small onion
2 inch cube of ginger - diced
10 ounces of mushrooms
6 green onions
3 large cloves garlic
1 tsp crushed red curry flakes
1/2 cup (4 ounces) red curry paste
2-3 baby bok choy
2 tbsp sesame oil
1 tbsp cornstarch
2 tbsp water
6 cups broth (chicken or vegetable)
4 kaffir lime leaves
juice from a lime
1 package of rice noodles

Heat an oven to 375 degrees. Line a baking sheet with tin foil. Drizzle with olive oil and place chicken breasts that have been lightly seasoned with salt and pepper on the baking sheet. Place in the oven and cook for 10 minutes. Remove from the oven and wrap the tin foil around the breasts to allow the breasts to carry over cook. Once the chicken is cool enough to handle thinly slice into small pieces.
In a heavy pot, heat the olive oil with the red pepper flakes. When the oil is hot, saute the carrots, onion, ginger, kaffier lime leaves, and garlic. After about 1-2 minutes add the curry paste, the mushrooms, and bok choy. Cook for another few minutes. Add the stock. Mix the cornstarch and water - add to the stew. Bring to a boil and once the stew has boiled for about a minute turn down to a simmer.

Cook for about a half an hour.

Rice noodles are delicate. Bring a pot of water to a boil with 2 tbsp salt. Add the rice noodles. Cook for about 5-6 minutes until al dente.

Serve the stew in a soup bowl. Put noodles in the bowl and pour the stew over top. Squeeze fresh lime juice over top.

Comfort food!

Wednesday, December 9, 2009

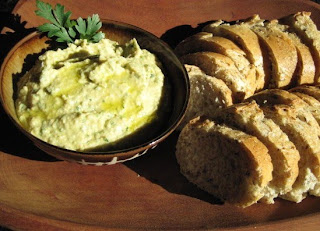
Parsley Hummus


Parsley Hummus
1 16 ounce can of garbanzo beans - drained and rinsed
1/2 cup italian flat leaf parsley
1/4 cup olive oil
1 tbsp tahini (sesame paste)
juice from 1 1/2 lemons
1 garlic clove
1 tsp kosher salt
1/2 tsp black pepper

Combine all ingredients in a food processor to desire texture. I like to puree to very smooth.

Serve with vegetables, toasted pita bread, crackers or bread.

Monday, December 7, 2009

Fried Wonton Skins with Cinnamon Powered Sugar and Blackberry Jam


Do you have a sweet tooth but don't want to spend a lot of time in the kitchen baking? This was a experiment that went really right! The fried wonton skins brown up to a delicate crispness.

2 cups canola oil
1/2 package of wonton skins
1/2 cup powdered sugar
2 tbsp cinnamon
Optional: warmed chocolate or jam

Mix the sugar and cinnamon - set aside

In a small heavy pot heat the oil for frying. If you are using a thermometer bring the oil to 350 degrees. If you don't have a thermometer dip a corner of a wonton skin in the oil. If it sizzles the oil is ready. Add 5-6 wontons at a time to the oil holding them in the oil with a Chinese spider utensil. When browned (watch them because they do brown quickly) remove and drain on a plate covered in paper towels.

Using a mesh sift sprinkle the Cinnamon powdered sugar over the wontons skins. Drizzle with warm chocolate or fruit jam based on your preference.

Saturday, December 5, 2009

Venison Meatloaf with Spinach and Red Onion


This week is hunting season in Ohio. The husband is hunting tomorrow so to get in him in the mood I cooked a venison meatloaf. I grew up in a family that never touched a gun so marrying into a hunting family was a new experience. I'll tell you though, I caught on pretty darn quick.

My mom was the queen of meatloaf with the spinach and red onion additions. When combined with a mixture of beef and venison the flavor is so much more intense than beef or a beef/pork mixture. Venison is a very lean meat. You do need to combine the venison with a meat that has a higher fat content, like ground beef that is 80% lean/20% fat or ground pork to ensure a moist meatloaf.

Try it - you'll love it!

Venison Meatloaf with Spinach and Red Onion
1 1/2 pound venison - ground
1 pound 80/20 ground beef
1 small red onion - diced
1 10 ou. pkg. frozen spinach - squeeze water from the spinach
3 eggs
1/2 tbsp dried oregano
1/2 tbsp dried basil
1 tsp kosher salt
1 tsp freshly ground black pepper
1 tbsp olive oil
1 cup of medium to dark beer
1/2 cup of your favorite BBQ sauce

Heat oven to 400 degrees.

If you have ground venison that's perfect. We process our own deer so we have 'stew cut' venison which is small to medium pieces of meat. In my situation, I use my food processer to 'grind' the meat. It works well.

In a large bowl, mix all ingredients except for the olive oil.

Drizzle the oil in a rectangle pyrex baking dish. In the baking dish, form the meat in a long rectangle form. Pour the beer over the meatloaf and cook for about 40 minutes. After 30 minutes spread 1/2 cup of your favorite BBQ sauce over the top of the meatloaf.

Remove from oven and allow to 'rest' for at least 5 minutes. Slice and enjoy!

Friday, December 4, 2009

Friday Night Pizza!


People are intimidated by dough. For some reason everyone must think making your own pizza dough is hard. It couldn't be easier!!! Pizza is a fun staple food in our house. This time it was sausage, onion, and mushroom pizza. YUM!

Bread flour is the secret to good dough. This type of flour has a higher gluten content and gluten is what makes a dough chewy.

Friday Night Pizza!
Dough
1 cup warm water
1 tsp active yeast
1 tsp sugar
2 1/4 cups bread flour
2 tbsp olive oil
1 tsp kosher salt

About an hour and a half before you want to make your pizza, start the dough. In a bowl add the water, yeast, and sugar. Let sit for a minute so the yeast can start to activate. Add one cup of flour and mix with a fork. Add the salt, 1 tbsp olive oil and remaining flour. Mix as much as you can with the fork. Once the ingredients are incorporated, knead the dough in the bowl about 20 times to build the gluten. Drizzle the remaining tbsp of olive oil on the inside of the bowl and move the dough ball around to coat. Let sit in a warm place for about 1 1/2 hours.

When you are ready to top the pizza, roll the dough out to the size of your pizza stone. Preheat the oven to 425 degrees with the pizza stone in the oven. After the oven and stone have preheated for about 15 minutes, take the stone out, sprinkle lightly with cornmeal, and place your rolled out dough on top. Pizza stones are my favorite cooking mechanism for pizza dough because the stone (when seasoned and cared for properly) pulls the moisture out of dough, resulting in a crispy crust. To properly care for the pizza stone, never put oil on the stone. By sprinkling lightly with cornmeal it allows you to keep the stone relativley clean from oils. Wash with mild detergent in hot water. Don't soak the stone. If for some reason you do get oils on the stone, bake the stone for about an hour to dry it out.

Prepare whatever topping you prefer. This time I sauteed some mushroom, onion and sausage I topped it with a good quality tomatos sauce and provolone cheese. Cook for about 15 minutes or until the cheese to done to your preference

Buffalo Chicken Cups


I've been thinking a lot about the holidays and entertaining. We always have friends over - planned and impromptu. It's great to have the ingredients on hand to whip together snacks. I've been experimenting a little. It seems like I always make the same things over and over so I wanted to come up with new ideas for recipes that include tastes my friends like.

This time I took the flavors of 'Buffalo Wings' and put it in a cup. The cup is so easy to find and use because it's just a wonton skin. It crisps up real easy. The texture is great with a crisp exterior and a soft yummy filling!
Buffalo Chicken Cups
2 boneless chicken breasts
1 tbsp olive oil
2 tbsp soy sauce
1/2 cup blue cheese dressing (I prefer Marzetti's brand in the refrigerator section)
3 ounces of cream cheese softened
3/4 cup of shredded cheddar cheese
1/4 cup Frank's Red Hot

Heat oven to 400 degrees.

Place tin foil on a sheet pan. Drizzle the olive oil on the pan. Place the chicken on the pan and drizzle with the soy sauce. Flip the chicken to coat. Cook in a 400 degree oven for about 12 minutes. Allow the chicken to cool for a few minutes so that you can handle it. Chop the chicken into small dices.

Lightly oil a 24 cup mini muffin pan. Place a wonton skin in each cup. Delicately push the wonton skin in the cup, careful not create a hole in the skin. With the back of a teaspoon place a little dollop of cream cheese on the bottom. Sprinkle with Red Hot sauce. Place a teaspoon (approximate) of chicken in each cup. Top with a 1/2 teaspoon of blue cheese dressing. Sprinkle with Red Hot sauce. Top with shredded cheddar cheese.

Once all the cups are filled, bake for about 6-7 minutes. Towards the end of the cooking time watch closely because they will turn darker quickly.